Synergy Quick Start Guide
First Time Setup
Your Synergy chips come pre-paired to each other with the default pairing key HEARTS and with LightLock mode enabled. All you need to do is unlock and power on your chips to get started with the default Flashing Patterns and default playlist.
Setup With a Computer
If you’re near a computer, you can use the Studio to change your pairing key and configure your chips. You can also use the Studio to start creating Flashing Patterns right away.
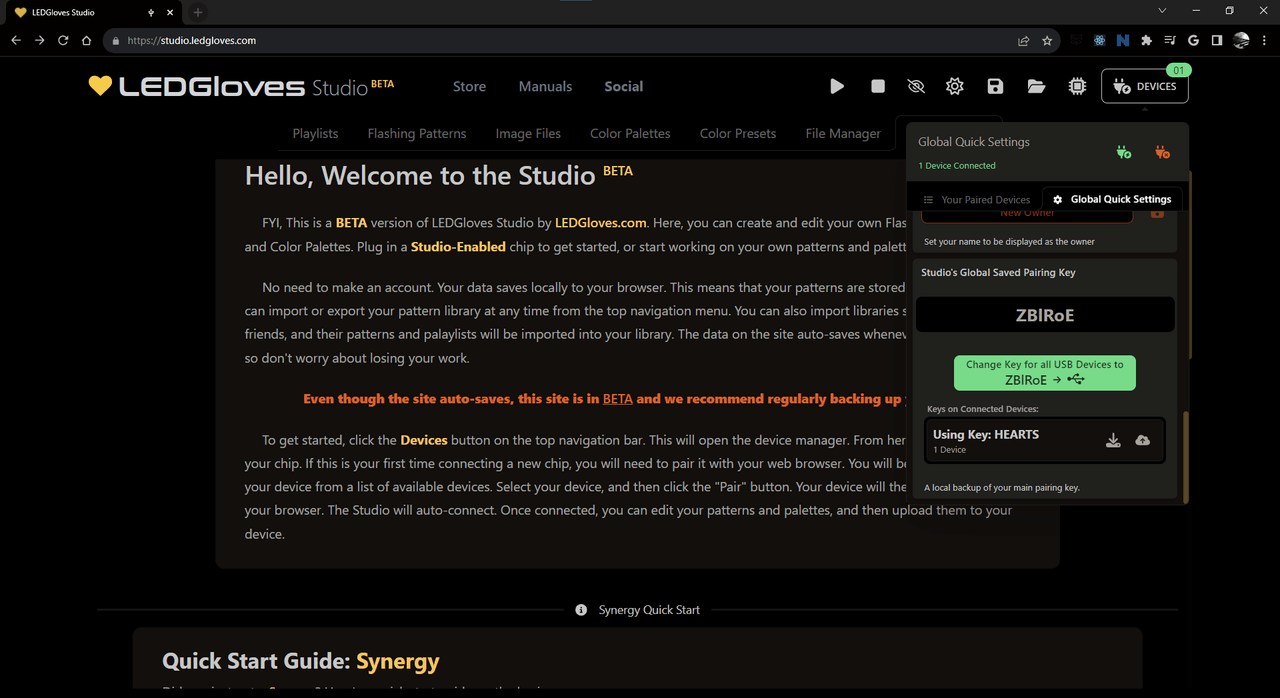
Plug your chip in to your computer with the included USB cable. Your chip will not automatically power on if it is asleep when plugged in. To wake your chip, press the button twice quickly. Your chip will show up as a USB drive on your computer called LED_FLASH. Your computer will also show a notification to open the Studio, our online editor. Click the notification to open the Studio in your browser. If you don’t see the notification, you can open the Studio by going to studio.ledgloves.com in your browser.
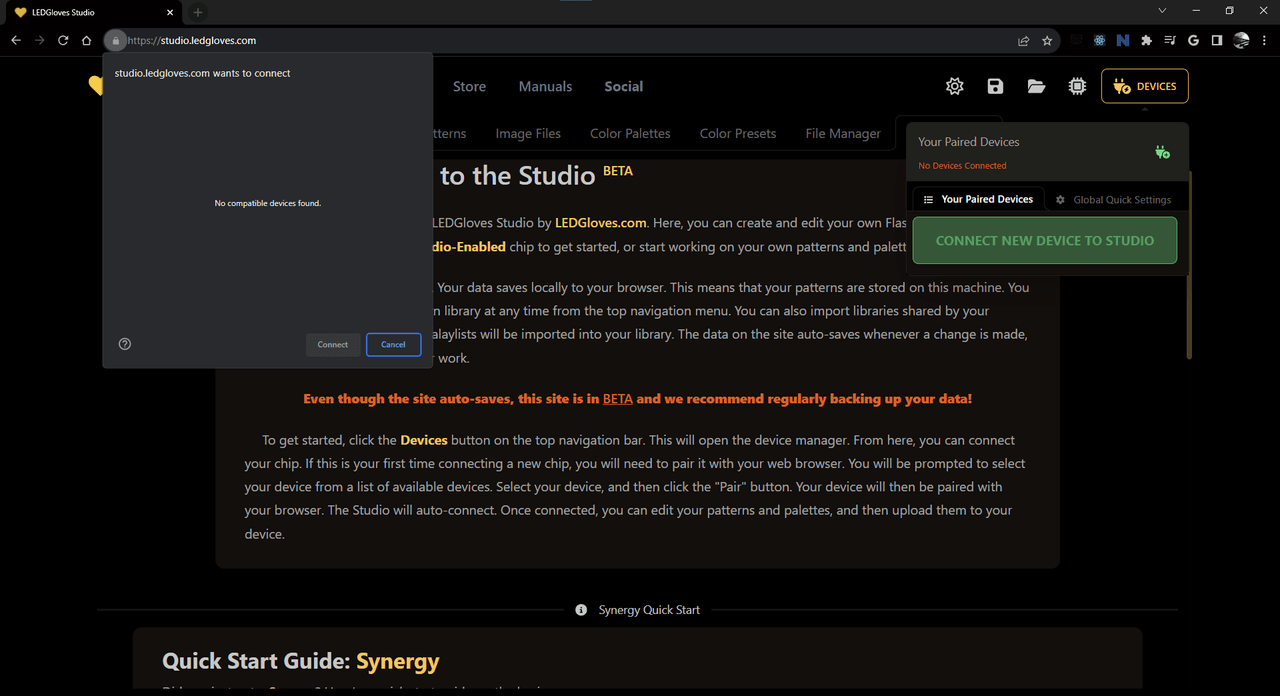
Once you have the Studio open, you will need to pair your chip with google chrome when connecting a chip for the first time. This is a security feature built into google chrome. Once inside the Studio, click the yellow device icon on the top left of the page. This will open a dialog box that will allow you to pair your chip with google chrome.
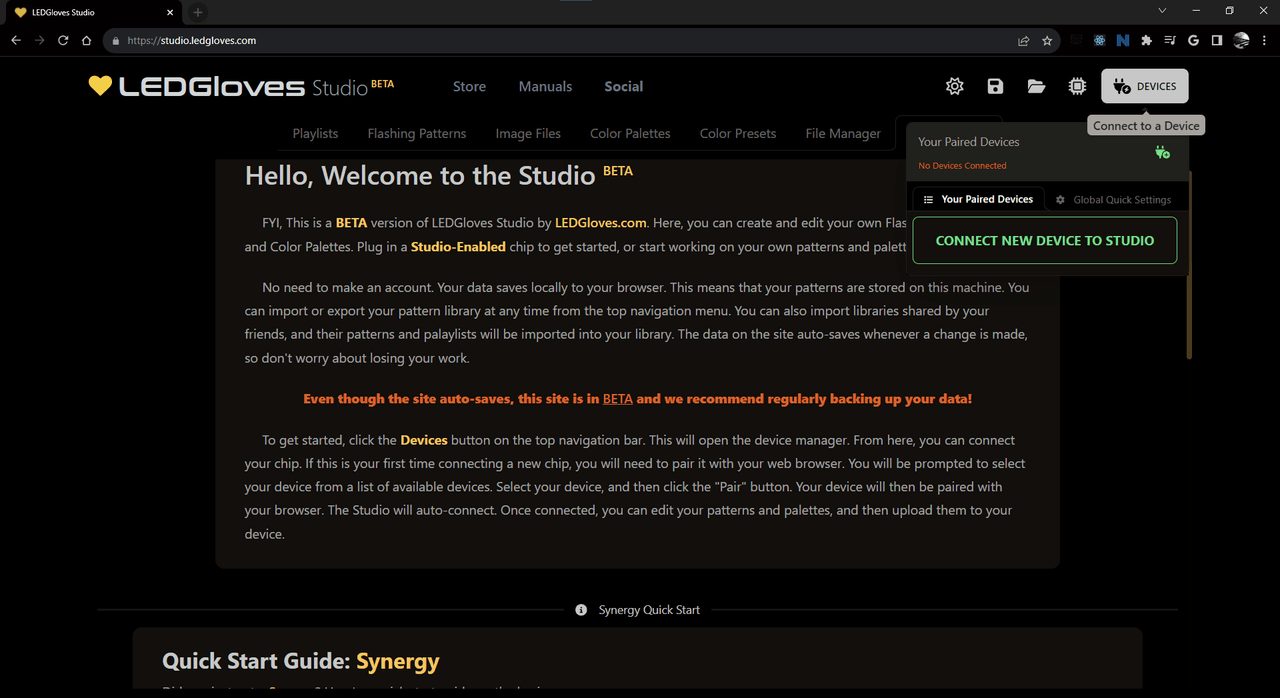
Click the “Connect” button to pair each of your chips with google chrome. You will only need to do this once per computer.
Once paired, your chip will show up in the device list on the right side of the Studio. You can click on your chip in the device list to open the device settings. You can change your pairing key and configure your chip in this menu.
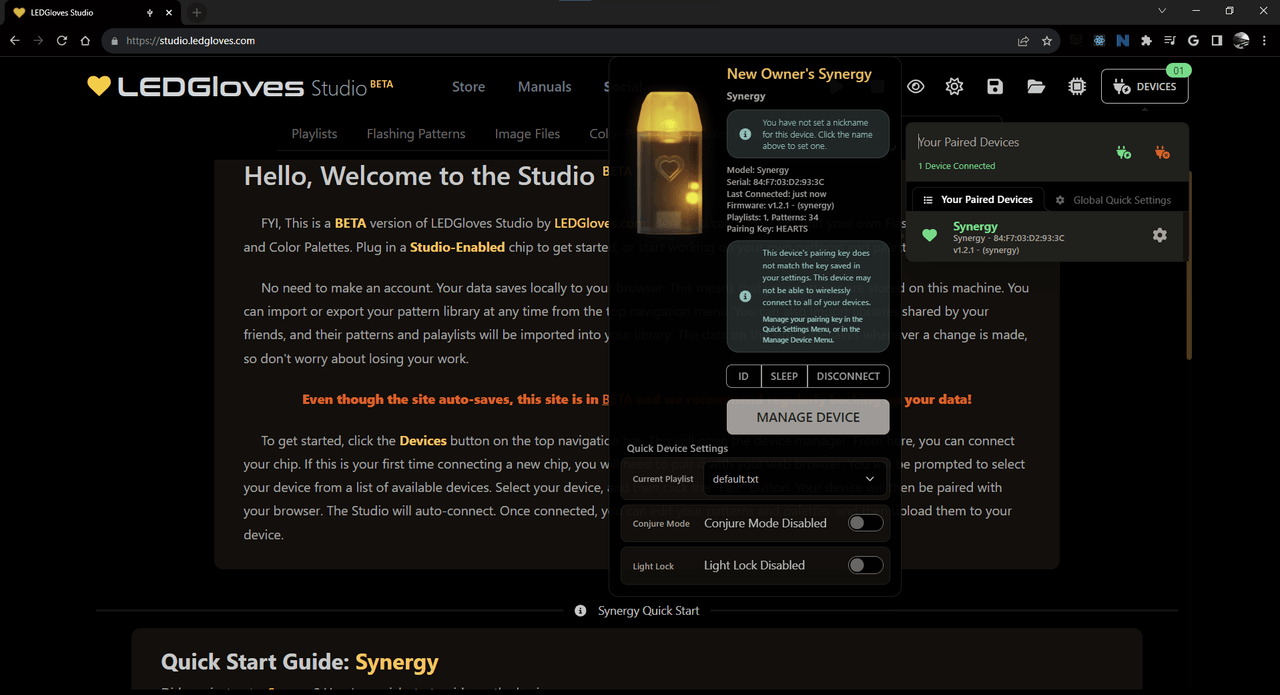
Your chips come pre-paired to each other with the default pairing key HEARTS. You can generate a new paring key in the Studio and then use that key for any chips you plug into your computer.
Once your chip is connected to the Studio, you can start creating Flashing Patterns right away. You can also use the Studio to change your pairing key and configure your chips.
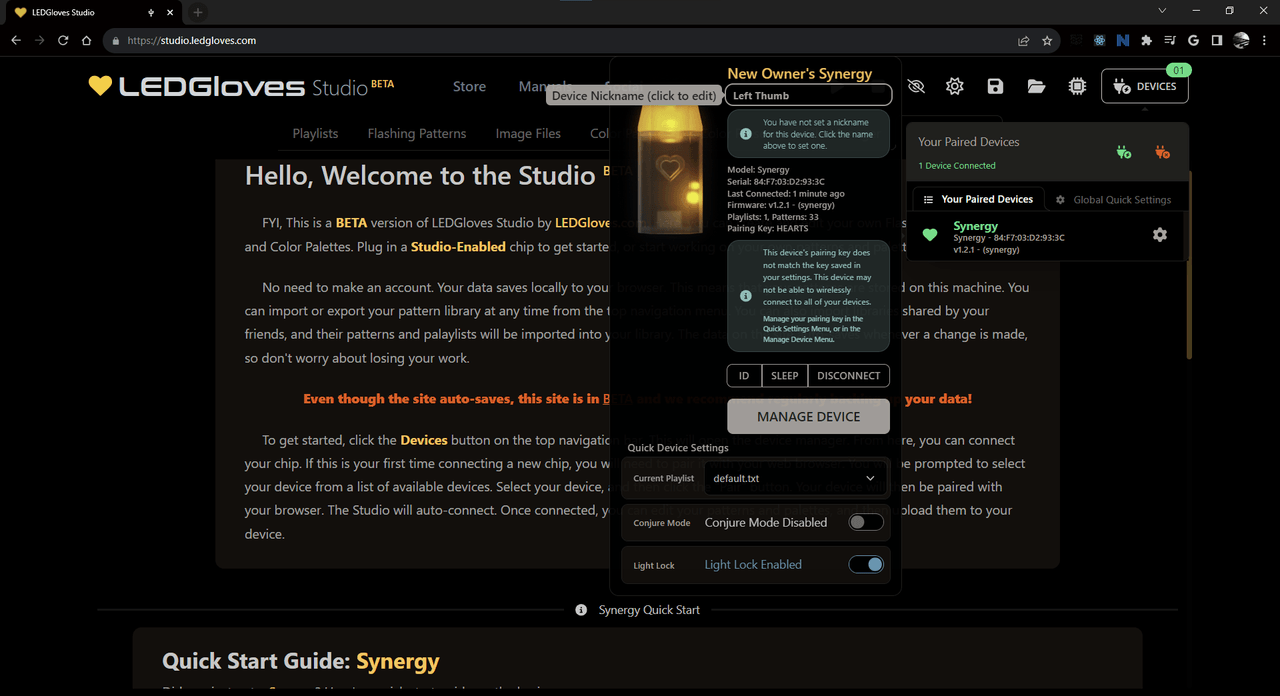
When hovering over your chip in the device list, you will see a notification to update the chip’s nickname. You can click on the chip’s nickname to change it. You can also change the chip’s nickname in the device settings.
If your chip is using the default pairing key, HEARTS, or if the chip’s pairing key does not match your preferred key saved in the Studio, you will see an option to either update your Studio’s saved key, or the key on your connected chips.
Setup Without a Computer
Quickly double tap each chip to unlock them and turn them on. Your chips will display the first Flashing Pattern in the default playlist. Once you have all of yur chips powered on, you can hold the button on one of the chips for one second, then release. The pattern fades out to black, and all of your chips will stop displaying the Flashing Pattern and will be awaiting more commands.

For First Time Setup
We recomend changing your pairing key from the default, HEARTS, to something unique to you. You can generate a new random key on your chips and re-pair them without a computer.
On all of your chips, hold down the top button while the chip is not showing a Flashing Pattern (OFF). Hold the button until the chip glows pink and then release. This will put your chip in to the pairing menu. While in this menu, your chip is ready to pair to new chips. You must do repeat this process on all of your chips to put them in the pairing menu.
4 secThen Release When
Pink To Enter
Pairing Menu
Once all of your chips are in the pairing menu, tap the button on one (ONLY ONE) chip to generate a new key and attempt to pair to the other chips. The other chips that are in the pairing menu will flash the same colors as the chip that is generating the key to indicate that thay are paired. Your chips will exit the pairing menu automatically once paired. All of your chips will now be paired to each other with the new key and will not be controlled by or control any other chips that are not paired with the same key.
Setting Up Multiple Chips with the Studio
Finish connecting and pairing the rest of your chips to the studio. You can assign all of them nicknames to help you keep track of them.
You can update your preferred pairing key in the Global Device Settings tab in the device list dropdown. You can then use this key on any USB-connected chip to quickly make them work wirelessly with each other.
Paring Chips to Each Other for Wireless Control
Your chips come pre-paired to each other with the default pairing key HEARTS. You can generate a new paring key via the pairing menu on your chips to enable them to sync commands and settings with other chips that are paired with the same key.
This pairing key is not used to pair to the Studio. Any chip plugged in via USB will be available to pair and connect to in the Studio.
If your chip is using the default pairing key, HEARTS, or if the chip’s pairing key does not match your preferred key saved in the Studio, you will see an option to either update your Studio’s saved key, or the key on your connected chips.
We recomend changing your pairing key from the default, HEARTS, to something unique to you. You can generate a new random key on your chips and re-pair them without a computer. On all of your chips, hold down the top button while the chip is not showing a Flashing Pattern. Hold the button until the chip glows pink and then release. This will put your chip in to the pairing menu. While in this menu, your chip is ready to pair to new chips.
4 secThen Release When
Pink To Enter
Pairing Menu
Once all of your chips are in the pairing menu, tap the button on one chip to generate a new key and attempt to pair to the other chips. The other chips that are in the pairing menu will flash the same colors as the chip that is generating the key to indicate that thay are paired. Your chips will exit the pairing menu automatically once paired. All of your chips will now be paired to each other with the new key and will not be controlled by or control any other chips that are not paired with the same key.
LightLock Mode
LightLock mode is designed to prevent your chips from turning on and wasting battery when in storage.
Once your chip is unlocked and powered on, you can toggle LightLock mode by holding the button on the chip for 2 seconds when not displaying a Flashing Pattern. Hold until the chip glows orange and then release. The chip will flash blue to show that LightLock is disabled. To re-enable LightLock, hold the button for 2 seconds when not displaying a Flashing Pattern. Hold until the chip glows orange and then release. The chip will flash green to show that LightLock is enabled. Toggling LightLock mode will also set LightLock to the same state on all other paired chips in range.
Toggling LightLock Mode
2 secThen Release When
Orange To Toggle
LightLock Mode
Once LightLock is enabled, your chip will auto-sleep after 10 seconds of inactivity when not showing a Flashing Pattern. To wake your chip, press the button twice quickly. The chip will automatically disable LightLock when you wake it up.
WHen LightLock is disabled, your chip will stay awake and wait for commands from other paired chips. After 30 minutes of inactivity, the chip will automatically power down to save battery.
Powering On and Off
Once woken up, your chips will play from the first entry in the last playlist used. If you have not created a playlist, your chips will play from the default playlist.
To stop your chips from playing, hold the button on one of the chips for one second, until the pattern fades out to black. Release the button and all of your chips will stop displaying the Flashing Pattern and will be awaiting more commands.
To power-off your chips, we recomend putting them in LightLock mode. This will prevent your chips from turning on and wasting battery when in storage. To put your chips in LightLock mode, hold the button on one of the chips for two seconds, until the chip glows orange. Release the button and the chip will flash green to show that LightLock is enabled. Toggling LightLock mode will also set LightLock to the same state on all other paired chips in range.
If LightLock mode is disabled, your chips will stay awake and wait for commands from other paired chips. After 30 minutes of inactivity, the chip will automatically power down to save battery. You can change this auto-sleep wait time in the device settings in the Studio.
If your chip has LightLock enabled, once stopped, it will wait for 10 seconds of inactivity before going back to sleep. To wake your chip, press the button twice quickly. The chip will automatically disable LightLock when you wake it up.
Creating Flashing Patterns
You can create Flashing Patterns in the Studio. There you can also share your Flashing Patterns with other users and download Flashing Patterns created by other users.
You can also add or create flashing patterns via a text editor and adding the files to your chip via USB. You can find more information on how to do this in the How to Use Flashing Patterns section.
Changing the Brightness of Flashing Patterns
You can change the Flashing Pattern brightness while the chips are not displaying a Flashing Pattern. Once stopped, hold the button down for three seconds, until the chip glows white. Release the button and the chip enter the brightness menu. You can cycle through brightness settings. This will change the brightness of any paired chips as well.
Then Release When
White To Enter
Brightness Menu
Once you have a brightness you like, hold down the button for one second until the chip glows green. Release the button and the chip will flash green to show that the brightness has been saved. This will change the brightness of any paired chips as well.
If you want to revert back to your old brightness, while in the brightness menu, hold down the button until the chip glows red. Release the button and the chip will exit the menu without saving any changes. This will change the brightness of any paired chips as well.
You can also ajust the brightness of Flashing Patterns in the Studio on a per-device basis in each device’s settings, or you can change the brightness of all of your chips at once in the Global Device Settings tab in the device list dropdown.