
Pattern Builder
A pattern controls how your LEDs light up: which colors they show, how long each color stays on, and how the pattern moves. You create and design patterns in the Pattern Builder tab of LEDGloves Studio. To put them on your chips, add them to a playlist or send them with the Pattern Uploader.
Want to know how patterns work under the hood? See How Patterns Work.
Creating a New Pattern
Section titled “Creating a New Pattern”Step 1: Open the Pattern Builder tab
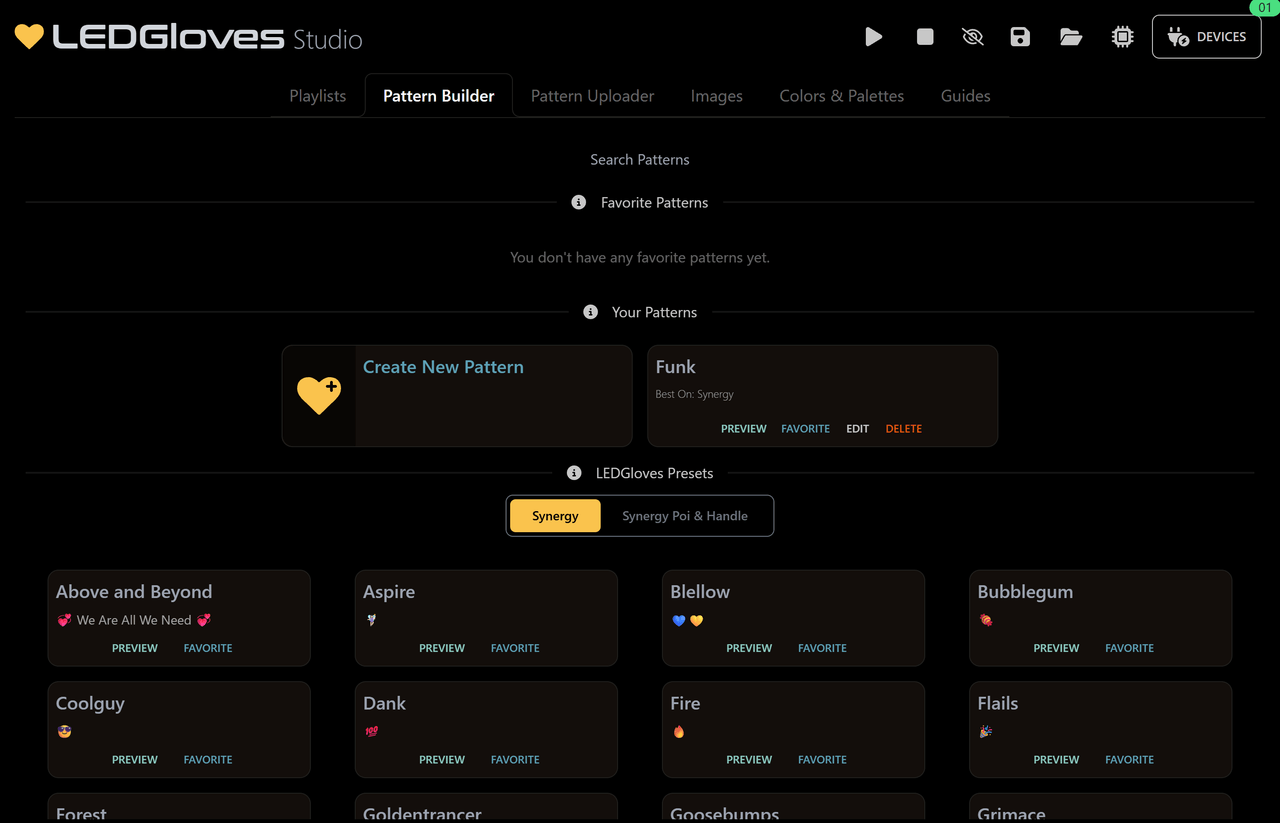
Section titled “Step 1: Open the Pattern Builder tab”Open LEDGloves Studio and click the Pattern Builder tab at the top of the page.
The page lists your patterns in three groups:
- Favorite Patterns holds the patterns you’ve marked as favorites.
- Your Patterns holds every pattern you’ve made.
- LEDGloves Presets holds ready-made patterns to start from. Use the buttons above them (Synergy or Synergy Poi & Handle) to see the presets made for your product.
Step 2: Create the pattern
Section titled “Step 2: Create the pattern”- Under Your Patterns, click the Create New Pattern card.
- Enter a Pattern Name.
- You can use up to 40 characters: letters, numbers, spaces, dashes (
-) and underscores (_). - Each pattern needs a different name, including names used by the LEDGloves patterns.
- You can use up to 40 characters: letters, numbers, spaces, dashes (
- You can also add a Pattern Description.
- Saves as File Named fills itself in from your pattern name, so you can usually skip it. File names can’t contain spaces.
- Under Looks/Works Best On, check the products this pattern is designed for.
- Click Create Pattern.
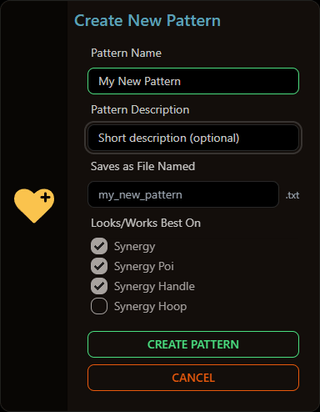
Your new pattern opens in the editor.
Step 3: Choose your colors
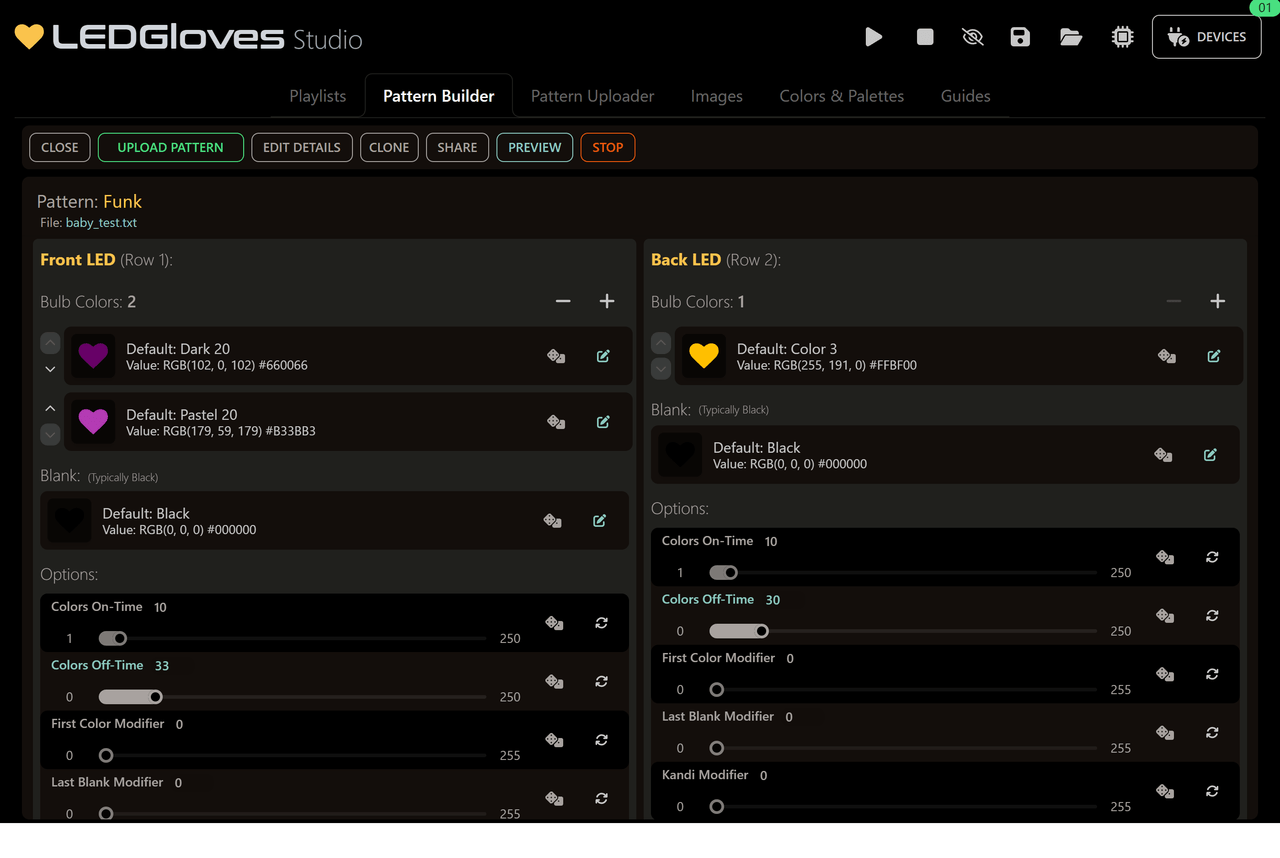
Section titled “Step 3: Choose your colors”The editor has a section for the Front LED (Row 1) and another for the Back LED (Row 2). Each section has its own colors and timing, so you can set up both LEDs the same way or make them different.
Adding and removing colors
Section titled “Adding and removing colors”Bulb Colors shows how many colors that LED cycles through. Click + to add a color, or − to remove the last one. Each LED can have 1 to 10 colors.
Use the up and down arrows next to a color to change its place in the order.
Picking a color
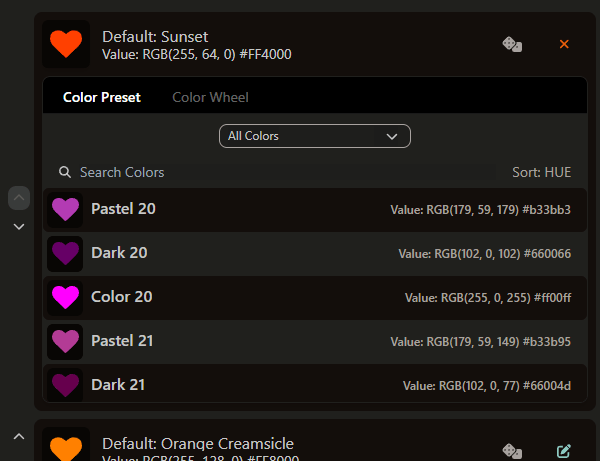
Section titled “Picking a color”Click the edit (pencil) button next to a color to open the color picker. It has two tabs:
- Color Preset: pick a saved color.
- Use the Palette dropdown to show only the colors in one palette. All Colors shows everything.
- Use Search Colors to find a color by name.
- Sort the colors with Sort: A-Z (by name) or Sort: HUE (by color).
- Color Wheel: pick any color by hand on the wheel, or with the Red, Green and Blue sliders. The bottom slider sets the brightness.
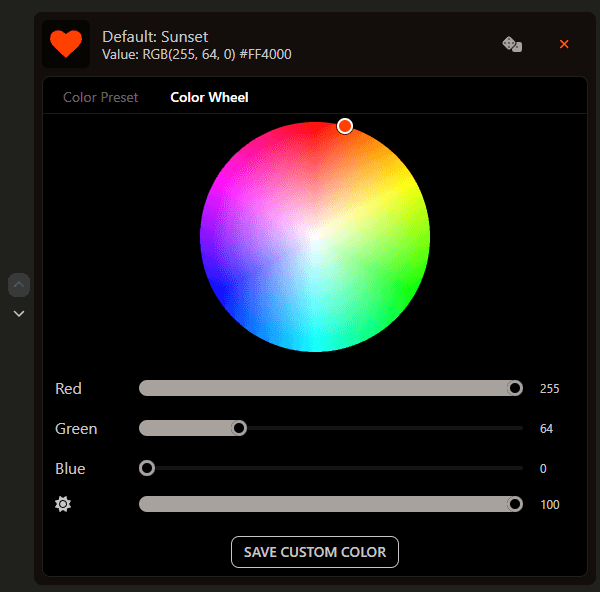
To keep a color you made on the wheel, click Save Custom Color, give it a name, and click Save. It then shows up under Color Preset and in the Colors & Palettes tab.
Blank color
Section titled “Blank color”Blank is the color the LED shows in the gaps between colors. It’s usually black (LED off). Changing it makes the pattern glow a background color between flashes instead of switching off.
Step 4: Adjust the timing and effects
Section titled “Step 4: Adjust the timing and effects”Each slider below the colors changes one part of the pattern. You don’t need to touch all of them. The defaults work, so change one at a time and preview as you go.
Controls on every slider
Section titled “Controls on every slider”- Drag the slider or type a number into its box to change the value.
- Randomize Parameter (the dice button): click it to have the chip pick a random value for this setting. Its tooltip changes to Randomized (click to turn off). Click it again to turn it off. Colors have a dice button too.
- Default Value (the circular-arrow button): puts the slider back to its starting value.
Options (Front LED and Back LED)
Section titled “Options (Front LED and Back LED)”| Setting | What it does |
|---|---|
| Colors On-Time | How long each color stays lit, in milliseconds. Higher numbers mean longer flashes. Range: 1–250. |
| Colors Off-Time | How long the LED shows the Blank color between colors, in milliseconds. 0 means no gap. Range: 0–250. |
| First Color Modifier | Gives the first color its own on-time, so it can stand out. 0 turns it off. Range: 0–255. |
| Last Blank Modifier | Gives the gap after the last color its own off-time. Use it to add a pause before the pattern repeats. 0 turns it off. Range: 0–255. |
| Kandi Modifier | Bounces back and forth between each pair of colors before moving on. For example, with colors A, B and C and Kandi at 3, the LED shows A B A B A B, then B C B C B C. 0 turns it off. Range: 0–255. |
For a closer look at how these settings work together, with examples, see How Patterns Work.
Additional Parameters
Section titled “Additional Parameters”Click Additional Parameters at the bottom of the editor to show two more groups of settings.
Tiling/Mirroring
Section titled “Tiling/Mirroring”| Setting | What it does |
|---|---|
| Split Position | — |
| Size of the pattern | How long the pattern is before it repeats. |
| Gap between repeats | The space between each repeat of the pattern. |
| Mirror the pattern when repeating | Flips every other repeat so the pattern looks mirrored. |
Scroll
Section titled “Scroll”| Setting | What it does |
|---|---|
| Scroll Base Offset | Where the pattern starts when it scrolls. |
| Scroll Frames | How long to wait before each scroll step. |
| Scroll Amount | How far the pattern moves each step. Negative numbers scroll the other way. |
If you turn on Randomize Parameter (the dice) for any scroll setting, an extra slider appears so you can choose how random it is.
Step 5: Preview your pattern
Section titled “Step 5: Preview your pattern”Use the buttons at the top of the editor:
- Preview shows the pattern on your connected chips right away. It’s greyed out until a chip is connected.
- Stop ends the preview.
Studio saves your changes as you go, so you don’t need a save button. Previewing doesn’t change what’s stored on the chip, though. To keep the pattern on your chips, see Step 6.
Step 6: Put the pattern on your chips
Section titled “Step 6: Put the pattern on your chips”The Pattern Builder is for creating and designing patterns. To put a pattern on your chips:
- In a playlist: add it to a playlist and upload the playlist. Studio saves the pattern inside the playlist, so you don’t need to upload it on its own.
- As its own file: send it with the Pattern Uploader. Choose it for every slot with Apply to All, or give each chip its own pattern. See Uploading One Pattern to Your Chips.
Managing Your Patterns
Section titled “Managing Your Patterns”Every pattern card in the list has these buttons:
| Button | What it does |
|---|---|
| Favorite / Un-Favorite | Adds the pattern to, or removes it from, Favorite Patterns. |
| Preview | Shows the pattern on your connected chips. |
| Edit | Opens the pattern in the editor. |
| Delete | Removes the pattern from Studio. Click Confirm Delete Pattern to finish. |
The editor also has these buttons at the top:
- Edit Details: changes the pattern’s name, description or file name. Click Save when you’re done.
- Clone: makes a copy of the pattern so you can try changes without losing the original. Give it a name and click Clone Pattern.
- Share: opens Share Pattern, with a link and a QR code. Click Copy to copy the link and send it to a friend, or let them scan the QR code. When they open it, Studio asks whether to import the pattern into their library.
- Close: closes the editor.