
Playlists
A playlist is the list of patterns your chip cycles through. You build playlists in the Playlists tab of LEDGloves Studio, then upload them to your chips.
Creating a New Playlist
Section titled “Creating a New Playlist”Step 1: Open the Playlists tab
Section titled “Step 1: Open the Playlists tab”Open LEDGloves Studio and click the Playlists tab at the top of the page.
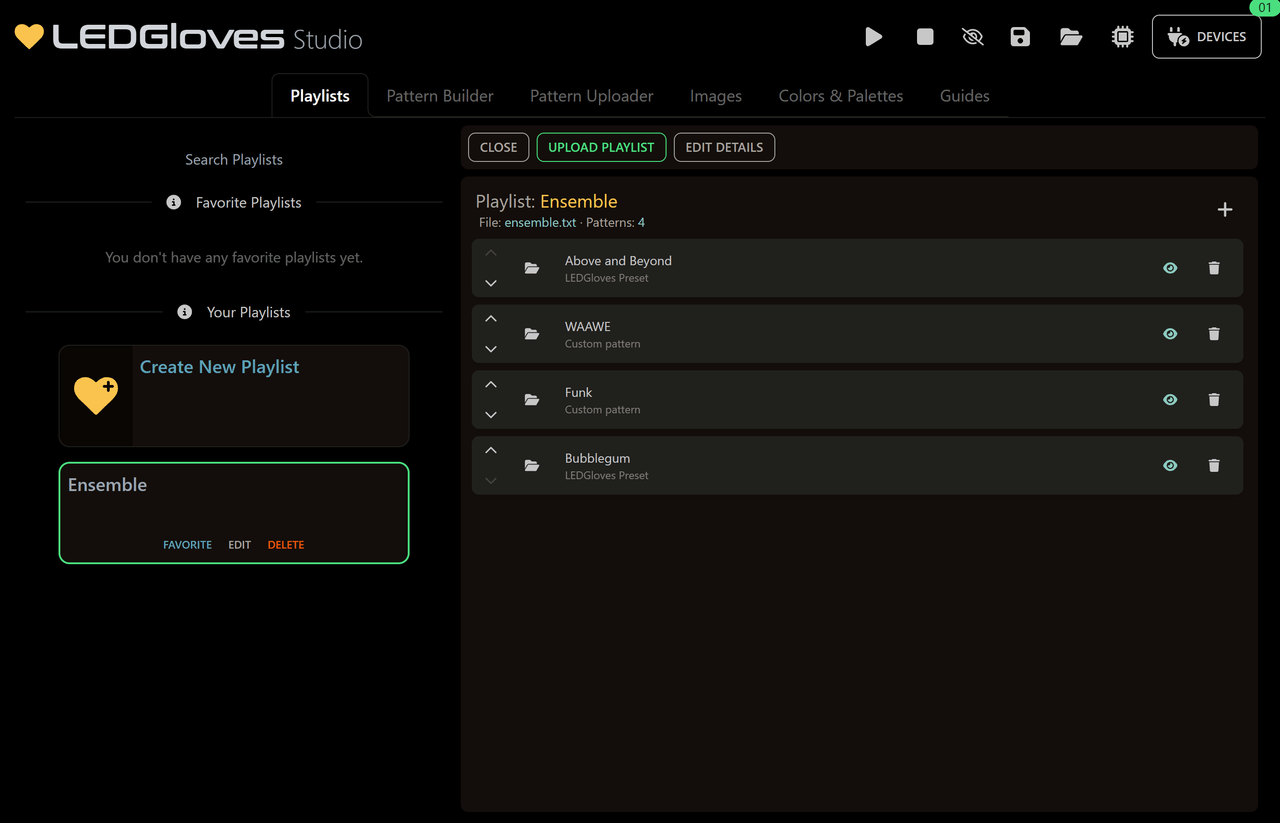
The left side of the page lists your playlists:
- Favorite Playlists holds the playlists you’ve marked as favorites.
- Your Playlists holds every playlist you’ve made.
Step 2: Create the playlist
Section titled “Step 2: Create the playlist”- Under Your Playlists, click the Create New Playlist card (the one with the gold heart and plus sign).
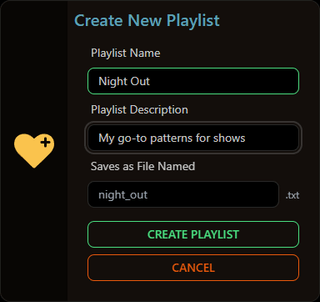
- Enter a Playlist Name.
- You can use up to 40 characters: letters, numbers, spaces, dashes (
-) and underscores (_). - Each playlist needs a different name.
- You can use up to 40 characters: letters, numbers, spaces, dashes (
- You can also add a Playlist Description to help you remember what the playlist is for.
- Saves as File Named fills itself in from your playlist name, so you can usually skip it. To pick a different file name, type it here. File names can’t contain spaces.
- Click Create Playlist.
Your new playlist opens on the right side of the page. It starts out empty.
Step 3: Add patterns
Section titled “Step 3: Add patterns”- Click the + (Add Pattern) button next to the playlist name. This adds a blank row.
- Click the folder icon (Choose Pattern) at the left of the row. A list of patterns opens, in sections:
- Your Patterns: patterns you’ve made in the Pattern Builder tab.
- LEDGloves Glove Patterns: the ready-made patterns for gloves that come with Studio.
- LEDGloves Poi Patterns: the ready-made patterns for poi and poi handles.
- Custom Patterns: patterns you’ve set up in the Pattern Uploader, where each chip can play its own part.
- On Device Only: files found on your connected chips that aren’t in Studio, such as images or files from friends.
- To show just one section, choose it from the Pattern Type dropdown, or choose All Patterns to see everything. If a file you just put on your chip is missing, click Refresh.
- Click Preview to see a pattern on your chip, or Use to add it to the playlist.
- Repeat for each pattern you want in the playlist.
Under each pattern’s name, the row shows where it came from: Custom pattern (from the Pattern Builder or the Pattern Uploader), LEDGloves Preset (with · Poi for poi presets) or On-device pattern.
For an On-device pattern row, you can also type a file name straight into the row (Pattern File Name) instead of using the folder icon.
If you delete a pattern from Studio that a playlist uses, its row shows This pattern no longer exists in the Studio. Choose a different pattern for that row.
Step 4: Arrange your patterns
Section titled “Step 4: Arrange your patterns”Your patterns play in order from top to bottom. To edit the list:
- Use the up and down arrows (Move Up / Move Down) on the left of a row to move it.
- Click the trash can (Remove) on the right of a row to remove it.
- Click the eye icon to preview that row’s pattern on your chip.
Step 5: Upload the playlist to your chip
Section titled “Step 5: Upload the playlist to your chip”- Make sure your chip is connected over USB. Upload Playlist stays greyed out until a chip is connected.
- Click Upload Playlist at the top of the playlist editor.
- When the upload finishes, Studio shows a Playlist Uploaded message.
The playlist goes to every chip connected over USB. To put it on only one chip, unplug the others first.
Step 6: Play the playlist
Section titled “Step 6: Play the playlist”From the Studio
Section titled “From the Studio”Use Current Playlist to set your chip’s default playlist: the one it plays when you turn it on.
- Connect the chip with a USB cable.
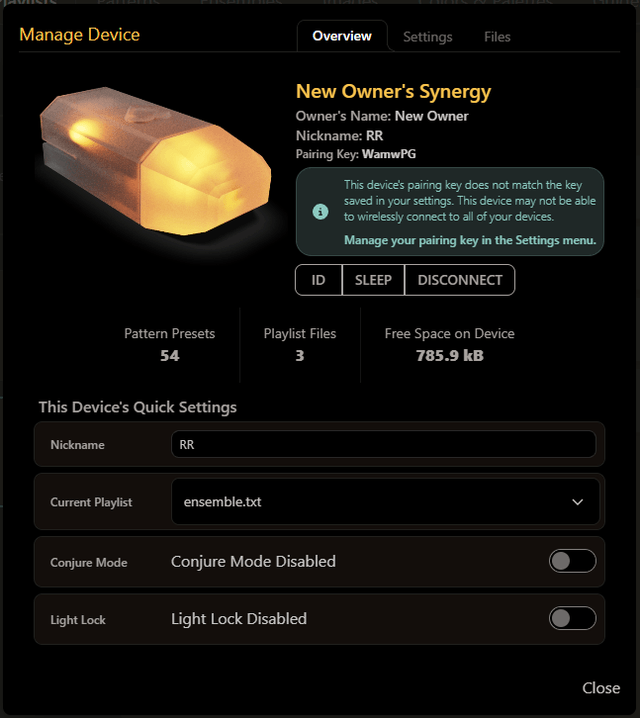
- Open the Devices menu in the top bar and click the gear (Manage Device) next to your chip.
- On the Overview tab, find This Device’s Quick Settings.
- Choose the playlist from Current Playlist. The chip switches to it straight away.
- The list shows the playlists already on the chip, so upload the playlist first (Step 5). If one you just uploaded is missing, choose Re-Import Device’s Playlist List in the list.
- This only changes the chip you’re managing. To set the playlist on several chips, do this for each one.
From the chip
Section titled “From the chip”Use the playlist menu.
- Turn your chips off.
- Hold the button until the chip blinks purple, then release.
- The chip blinks once for playlist 1, twice for playlist 2, and so on. Playlists are numbered in alphabetical order by file name. Click to go to the next playlist, or double-click to go back one.
- Hold 2 seconds and release to use the selected playlist.
See the Synergy Quick Start for more about the playlist menu.
Managing Your Playlists
Section titled “Managing Your Playlists”Every playlist card in the list has these buttons:
| Button | What it does |
|---|---|
| Favorite / Un-Favorite | Adds the playlist to, or removes it from, Favorite Playlists at the top of the list. |
| Edit | Opens the playlist in the editor. |
| Delete | Removes the playlist from Studio. Click Confirm Delete Playlist to finish. |
In the editor, click Edit Details to change the playlist’s name, description or file name, then click Save. Click Close when you’re done editing.
Use Search Playlists at the top of the list to find a playlist by name.